23 October 2014

Sweet & Sour Chicken

This tasty recipe is failsafe (low 'food chemical') and gluten-free. I hope you enjoy it!


Serves 4

Ingredients
  • 450g chicken breast fillet, sliced thinly
  • 2 Tbspns cornflour*
  • canola oil for frying
  • 1 choko, peeled and thinly sliced
  • 3 spring onions, sliced
  • 100g sliced bamboo shoots (tinned)
  • 1 cup red cabbage, shredded
  • 1 clove garlic, minced or crushed
  • 1 cup tinned pears, diced (reserve syrup from the tin)

Sauce:
  • ½ cup pear syrup (from tinned pears)
  • ½ cup water
  • 2 Tbspns brown sugar
  • 1 Tbspn gin
  • 2 tspns cornflour
  • 1 ½ tspns citric acid
  • 1 ¼ tspns salt

Method

1. Mix the sliced chicken with the cornflour. Heat a tablespoon or two of canola oil in a large frypan or wok. Fry half the chicken, until golden brown. Remove from pan, and set aside. Fry the second batch of chicken in the same way, adding a little extra oil if necessary, and set aside.

2. Mix the sauce ingredients together in a small bowl or measuring jug. Put the cornflour into the jug first, and just add a little water, whisking constantly. When this paste is smooth, add the remaining water, whisk, and then add the other ingredients.

3. Heat a little canola oil in the pan. Stir-fry the choko, spring onions, bamboo shoots and cabbage for a few minutes. Add the garlic, and fry for another 10-20 seconds. Return the chicken to the pan, stir well.

4. Add the sauce, and diced pears to the pan. Stir well, until sauce has boiled and thickened.

5. Serve with rice or rice noodles.

*cornflour = white cornstarch, not cornmeal or polenta


04 October 2014

New Garage Doom

Oh god, it's the garage AGAIN ... as usually happens when we move house, a bunch of stuff just gets dumped in the garage by everyone who's helping us move, and ourselves, as the move gets into the awful ending hours. And there it sits. And sits. And SITS. The question "Where is the ...." invariably gets answered with those dread words "In a box in the garage somewhere".

When we moved in March, we only unpacked the things we really wanted out, which means a fair few boxes are still unpacked. Upstairs is glorious — minimalist, sunny, uncluttered, and a delight to live in, I gotta say. Easy to keep clean, cos it's not full of stuff.

But. The minimalist in me is desperate to clear out the garage too. And we need to. House inspection coming up, and I'm just generally sick of the mess. So it's back to hours of cleaning, tidying, sorting, and culling. And to Freecycle, and Salvos, and recycling.

Some progress has been made —

The before photo is on top, and the 'after some hours of work' photo is underneath. No, I wasn't sure, either.

A major challenge, as ever, is that a lot of this isn't mine — it's my son's glassmaking gear as he's not allowed to use the wonderful tiled workshop area in the garage for his glasswork because the owners are annoyingly paranoid and ignored our reasons why it was safe  refused permission.

So that's all a mess, and unused (he is setting up a studio in an old caravan thingy out the front, but it's taking a while). And a lot of it is son's and dotter's shtuff. Endless shtuff. Or hubby's shtuff. 

Getting there  s l o w l y. And who knows, maybe one day we can actually *gasp* park the car in the garage.

24 September 2014

Alabama Chanin

A few months ago I stumbled fortuitously across Alabama Chanin — an American couture house that not only hand sews all its garments for sale, and pays its sewers a living wage, but also makes all its patterns, stencils and techniques open source. Swoon.

I haven't been this excited and inspired by hand crafts for a long time. I love their philosophy, and their designs.

I bought their third book, Alabama Studio Sewing + Design, and practically hyperventilated when it arrived.

This is the 'baby doll tunic' that I made, using the patterns from this book. I started sewing on 22 July, and finished the garment on 14 August, so it only took about three weeks. I did made some adjustments to the fit after this, but that was the work of an hour, at most.

Something about sewing this entirely by hand appeals to me so much. It's portable. It's simple. It's careful, slow work, akin to knitting. You can do it on the train, or while watching TV — no need to be plugged in to a sewing machine to work. You don't get things caught up or stitched wrongly, because you're making one stitch at a time, and you can see both sides of the work easily, not like with machine sewing.

I love my slightly erratic stitches, the look of them, the fact that they're not perfect. The seams that show on the outside. I love learning hand stitches and techniques that have been used through the ages, like stretch stitches, and how to do a flat felled seam.

So yeah. Totally. In. Love. Little bit obsessed.


The decoration on the bodice is reverse appliqué — the black top layer is cut away, after the stitching is done, to reveal the grey lower layer. I used the Alabama Chanin stencil designs as a starting point, and just drew the design on in chalk, as I went.


 The inside of the bodice piece. I used upholstery thread, waxed, for all my sewing on this garment — strongest thread I could find.


Both the bodice pieces done. Each piece is so small and portable — a bodice half, plus thread, needle, scissors, and beeswax (great for handsewing thread) — into a smaller bag than a knitting project.


Starting on construction — doing the shoulder seams here.


The outside of the shoulder seams.


 Binding for the armhole and neck, with a great stretch stitch.


Changed to black edging for the front of the bodice.


Sewing the gathered skirt on took a loooong time. This vertical stitch is a stretch stitch.


After I was finished, I decided to cut some out of the lower back, and stitched a dart in there, and I needed to shorten the straps too. Very happy with the result!


04 September 2014

Failsafe Choko Salad

I must admit I was surprised to discover that chokos are rather good raw. Whole vistas have opened up in front of me! Here is a simple failsafe salad I made last night. It was very tasty.

choko saladIngredients

1 small choko
¼ cup bamboo shoots
1 spring onion

Dressing

1 part canola oil (or other failsafe oil)
1 part citric lemon juice (4 Tbspn water, 1 tspn sugar, ¾ tspn citric acid)
salt to taste
maple syrup to taste

Shake together in a small jar.

Method

Peel and thinly slice the choko into matchsticks.
Slice up the bamboo shoots too (just roughly).
Finely slice the spring onion.
Combine in a bowl, and toss with the dressing.

And you're done!

30 August 2014

Failsafe Sago & Potato Fritters

This is my adaptation of the Indian saboodana wada recipe from Mr Todiwala's Bombay cookbook. These are sago and potato fritters, with peanuts, cumin seeds, coriander leaves, lime, and chilli. Naturally those ingredients are out on a failsafe diet, so I created this adaptation.

The fritters have a great texture, sort of glutinous and chewy, with a crispy shell. Very moreish!


Failsafe Sago & Potato Fritters (saboodana wada)

Fritters on a platter with sauce
Fritters with pear ketchup

Ingredients

200g preservative-free sago pearls* (can be large or small)
2 large potatoes
3 Tbspn raw cashews
1 tspn poppy seeds
¼ tspn citric acid (or to taste)
salt, to taste
1 Tbspn spring onion tops or parsley, chopped finely
rice flour
failsafe oil (eg canola) for deep frying

Method

1) Rinse the sago, put in a bowl, and add enough water to cover the sago. Leave for at least several hours (if using small sago) or overnight. I used small sago, and left it overnight, and that worked well.

sago
Sago after soaking overnight
If there's any water left over after soaking the sago, drain it well in a sieve. Let sit in the sieve for 15-20 minutes to get rid of any excess moisture.

2) Peel, boil, and mash the potatoes.

3) Slightly dry-roast the cashews in a small pan, stirring constantly. Then chop them finely (but not too finely). You can use a small food mill or processor for this step, but don't let the cashews become a paste.

Potato and sago mixture
Mashed potato mixed with the sago
4) Mix all ingredients except the rice flour in a bowl. If the mixture is too wet, add a little rice flour.

I actually did this in two stages. I mixed the sago, potato, cashews and salt together first. Then I set aside some of this mixture for myself, and added some poppy seeds, citric acid, and spring onions. I made the remainder of the mixture as per the original recipe (adding 1 tspn cumin seeds, 2 diced green chillies and 1 tspn lime juice), for the rest of my family who aren't eating failsafe.

5) Dust your hands with rice flour, and shape the mixture into small patties, a bit smaller than the palm of your hand. Keep dusting your hands with the rice flour as you go. Place the patties on baking paper on plates, and refrigerate for at least 30 minutes before cooking.

Uncooked fritters
Fritters ready for the fridge
6) Heat the oil in a deep saucepan to 180ºC (either use a thermometer, or test a cube of dry bread in the oil - when it browns in 30 seconds, that's 180ºC). Put a colander over a plate, to drain the patties in (they may stick to kitchen paper).

7) Fry a couple of patties at a time, until golden brown. Turn to get even cooking. Drain in the colander.


Fried fritters

They are really good served warm, with pear ketchup, or any other favourite failsafe relish or dip.

* Sago from the supermarket generally has preservative in it, which is driven off by cooking — but in this recipe, the sago is soaked but not boiled, so if you're sensitive to preservatives, look for preservative-free sago or tapioca pearls. Sources include Asian grocers, Natures Works shops and Bobs Red Mill (tapioca pearls).


29 August 2014

Failsafe Sautéed Chokos

I'm trying the Royal Prince Alfred Hospital's "failsafe" elimination diet again (it seems to help me with brain fog and some other CFS symptoms, and I'm desperate enough), sigh. It is a seriously un-fun thing to do, especially for a tea drinker who loves cooking with a lot of herbs, spices, and chilli.

The list of allowed vegies during the elimination diet phase is very limited, and includes some of the few vegies that I'm not keen on (chokos and Brussels sprouts). More sighs.

Last night I read up in Stephanie Alexander's Cook's Companion about chokos:

"Every culture treats the choko differently but no one claims it has a very distinctive flavour. ... The choko's indeterminate character (or blandness, if one is being unkind) explains why it is often combined with spicy flavours." 

Oh, I'm being unkind. Bland, and slimy. Take that, chokos.

I opted for the plainest recipe she offers, seeing as spicy flavours are out. This was Choko sautéed western-style. I made a few ingredient changes, and it turned out quite well, I must say. A good crisp texture, with a lovely buttery and lemony taste. Even Hubby, who doesn't like chokos either, said it was the best choko he'd ever had (from a lifetime of disappointments).


Failsafe Sautéed Chokos


Failsafe Sautéed Chokos


Serves 2 as a side dish
115 cal per serve

Ingredients
  • 1 medium choko
  • 30 g butter
  • citric acid
  • salt

Method
  1. Peel and slice the choko. 
  2. Heat in fry pan with the butter, and sauté until the choko is lightly brown, and just tender. This will probably take about 4-5 minutes. You don't want it to go completely soft. 
  3. Lightly sprinkle over citric acid (to taste) for a lemony hit, and salt to taste. Serve hot.
  4. Optional: sprinkle with a little parsley at the end.


15 July 2014

Weighted Bed Socks

I live with constant foot pain, kind of plantar fasciitis on steroids (congenital abnormality in my feet, possibly related to my hip dysplasia). All very boring. Nights are the worst, and foot pain and sort of 'antsy' cramping frequently disrupts my sleep. I accidentally discovered a few weeks ago that putting a heavy weight on my feet dampens down the pain a great deal, and allows much better sleep. So these might help you too, if you have foot cramping, aches, neuropathic pain, or plantar fasciitis.

If you're not sure if weighted socks will help you, do a test using a large ziplock bag of sand or a large unopened packet of rice. Drape it over your foot, and see if it feels nice. Put a pack of rice in a pillow case, and put it on your feet at night. Does it help?

At first I made a small weighted foot blanket. This was OK, but did tend to slip off. You could make a bed-width narrow weighted blanket though, that would probably work moderately well. There is a good tutorial here.

I decided to experiment with making weighted bed socks, and this is the result:


Socks with pellets in the soles


They make such a difference to me, that I thought I should share this idea with you, in case it helps you too!


Materials:


  • 2 pairs of socks with a fine weave (ie regular cotton socks — handknit socks might allow the small pellets to push through the fabric)
  • Tailor's chalk
  • Darning 'mushroom'
  • Pins / safety pins
  • Needle and thread
  • Weighted fill — slingshot pellets, ball bearings, duck shot (not lead)
  • Scales & a pouring device (funnel, small jug etc)
Slingshot pellets

The best weights I found were small steel balls. You could use ball bearings, but they're pretty expensive. I settled on slingshot steel pellets, which cost me $45 AUD for 1 kg of shot.

DO NOT USE LEAD. No level of lead exposure is safe, and wrapping it in plastic or fabric won't be enough protection. Gold's a safe option, though!

Method: 


1. Put one sock on your foot, then the second sock over the top of it, lining up the toes and heels.

2. Using chalk, draw around the edge of your foot, for where you want the weights to go to. If you have a lot of arch pain, for instance, you might like it higher on that side. Also draw lines across the sole to divide the area into 4 roughly even strips. You may like to add a vertical line down halfway, too. I just did this division for the top half of my socks. Basically, the filling is going to shift around, and the pocket divisions help hold it in place.

3. Using either pins or safety pins, carefully pin the socks together in a few places (heel, toe, each side). Don't pin your foot!

4. Take off the socks. Put the darning mushroom inside the doubled socks, and sew around the outer border of the chalked line. Start at one side of the heel end, sew down a side, around the toe, and up the other side, removing pins as you go. Leave the back of the heel area open. I used herringbone stitch, which is a great stretch stitch.


Close up of Herringbone stitch
Herringbone stitch close up

5. Weigh your filler material. I had 1 kg of pellets, and two socks to make, each with 4 sections (2x4=8) so I used 1,000g/8 = 125 g for each section. Weigh out the amount (whatever you calculate yours to be), into a small measuring cup or bowl. If you only have heel pain, then just make pockets for the heel region — adapt as necessary!

6. Carefully unfold / open up the gap between the inner and outer socks to reveal the heel opening into the pocket you've just sewn. Carefully pour in your first lot of filler. A funnel can help, or something with a spout.


7. Fold back the socks as they were, shake down the filler to the toe of the sock, and put in the darning mushroom again. Using herringbone stitch (or another stretch stitch), hand sew across the first horizontal line, sealing in the toe section of weighted filler.

8. Repeat this procedure until all the other sections have been filled, then sew the heel opening closed.

Stitching lines

9. Distribute the filling as you like across the sole of the foot, and sew the vertical divider line, if you so desire.

10. Make the second sock! Rejoice!

Obviously these are not designed to be walked in! You may look like some weird alien footed beast — totally worth it! Plus it's an emergency cosh if you ever need to whack someone over the head while in bed ... Hang on, just a minute (fumble to remove sock), OK, now hold still while I hit you over the head! It would not totally work.

Completed sock being worn

Filling materials

Less heavy but cheaper options are sand or a fine gravel. You would need to enclose sand in a plasticised fabric (PVC, oilcloth, heavy plastic bag etc), to ensure it doesn't leak out. Plastic pellets are used often for weighted blankets, as they're washable. They aren't as heavy as the metal balls, though.

Warning: Do not trim back the top sock layer! I tried this on my first pair, to reduce fabric bulk, and it meant the sock no longer had the strength to hold the heavy weighted sole on my foot. I had to remove the pellets, and throw out the socks. You need both layers of the doubled sock to hold the thing in place.

17 June 2014

Lip Biopsy — What to Expect

Gross photos warning ... pics are small, if you really want to see them close up, click on the pics.

For the last 9 months, I've had constant lower facial numbness and asymmetric swelling of my lips — it may be a sarcoidosis thing. So eventually my immunologist ordered a lip biopsy for me, for joy. Mainly to see if there is any need to increase my medication. It's worth mentioning that every nurse and doctor I mentioned the biopsy to shuddered.

I had the biopsy last week. The oral maxillofacial (OMF) surgeons did a professional job, and were nice guys, but they really didn't prepare me in any way for the recovery period. And any hospital information sheets I found online mentioned 'some discomfort' after the local anaesthetic has worn off. LIES!

So I thought it might help others if I document about what to expect during and after a salivary gland / lip biopsy.

Before

I had an initial appointment with the OMF team a few weeks before the procedure.

On the day of the procedure, I took 10 mg of diazepam — let's just say I was a tiny bit anxious about the whole thing. I started on prophylactic antibiotics, too, but that's unusual — this was because I'm on heavy immune suppression already, and have an artificial hip (which is always at risk from infections). It's not typical for most patients.

During

I was seated in a reclining 'dentist's chair' sort of thing, and given sunglasses to wear (to block out the bright light), and my body was covered by a sterile green sheet. Then I was given three injections of local anaesthetic, into the lower lip, inside, down near the gum — right, middle, and left. They stung a bit, and were a bit painful, but bearable. Then I was left in the chair for 10-15 minutes while the anaesthetic worked its magic.

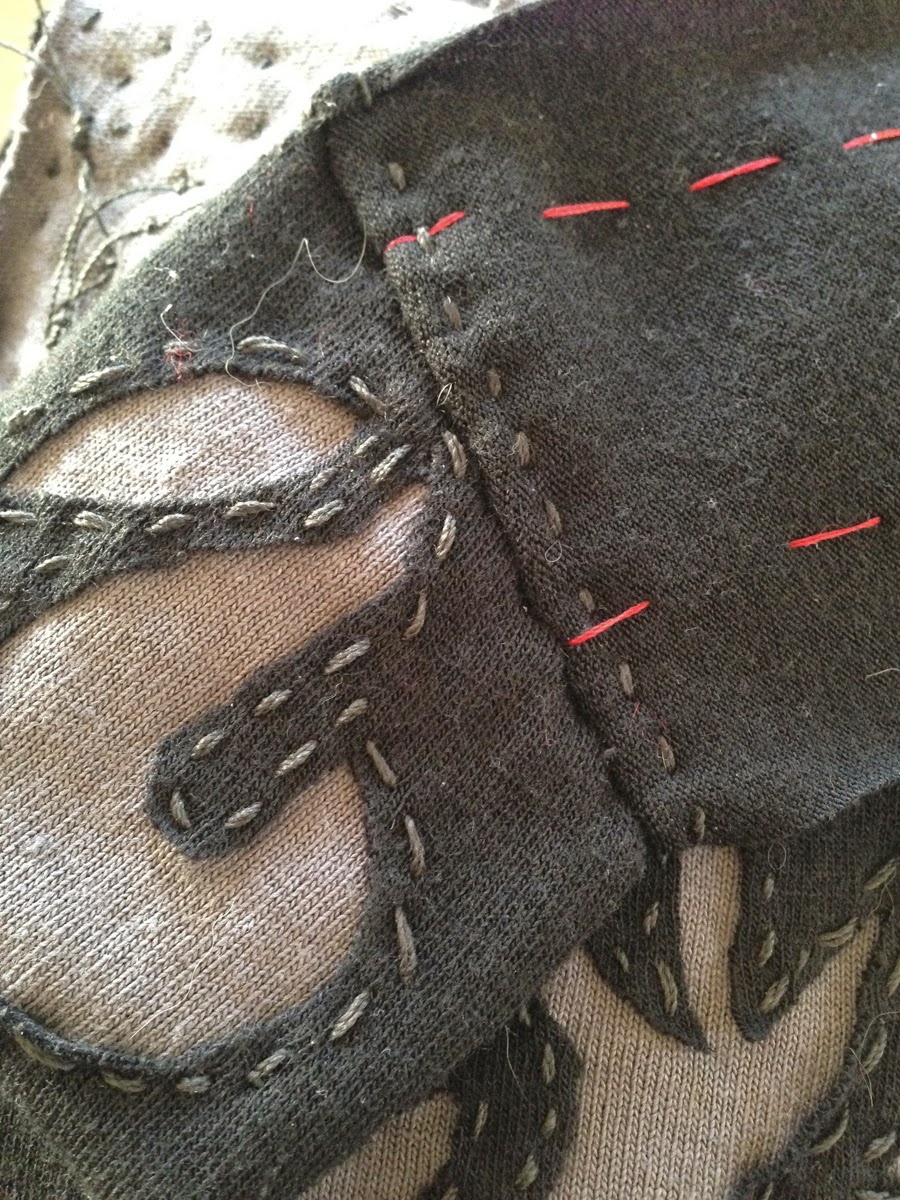
The biopsy itself took about 15-20 minutes. One surgeon held my lower lip out, and the other carefully cut out 5 salivary glands. Then he put in a row if stitches, which was very neatly done (no cut ends of thread sticking out into my mouth, everything was tucked away nicely). The incision was about 1 cm long, vertical, near the front of my lip. It didn't bleed all that much, either. I kept my eyes closed most of the time, only so much one needs to see of such things, after all!

Immediately After

Very relieved it was over! My lower lip was extremely swollen, not surprisingly, and very very numb (damn good stuff, that local). I was told to avoid drinking anything hot while the local was still working, to avoid accidental burns. I also had an antiseptic mouth wash to use three times a day, to keep the area clean. Easy. Here's what it looked like, after the blood was mopped up.

Stitches on inner lip after biopsy

After the Local Wore Off

HOLY FUCK

After about 3 hours, my dear friend, local anaesthetic, went away. It was not a pretty sight. Let's just mention stumbling downstairs to my children, weeping, unable to speak ... horrific pain. Really fucking awful. About a 9-10 on Allie's Pain Scale.

My son dashed out to buy me some Panadeine (we inexplicably had none in the house), and my daughter looked after me.

This was not 'some discomfort'. This was 'Kill me now, please' stuff. I don't know if the surgeon had cut some particularly important nerve, or if there's just so many damn nerves in the lips that it's inevitable, and I can't say whether my experience is typical or not. You may not have it as bad as this. But ... better to be prepared.

You will (probably) need heavy duty pain meds! You may need a script for something like Panadol Forte (ie something with a fair bit of codeine in it). At least lay in the strongest over-the-counter pain meds you can get. I react badly to opiates now, so it says a lot that the nasty side effects of opiates (the codeine in the Panadeine in this case) were preferable to the pain from the biopsy.

You also need an ice pack. The ice pack is your friend. Wrap it in a cloth. Don't leave it on your skin non-stop, otherwise you risk damaging the skin. 10 min on, 10 min off, that sort of deal.

I spent the rest of the day whimpering on the couch, doped on Panadeine, with an ice pack on my mouth, while my kids tried to distract me with Death in Paradise episodes ... I was able to sip a little milky tea through a straw, and a little soup. No talking, no eating, nothing that involved moving my lips at all. Intermittent weeping.

The Next Day

Could talk sorta kinda, in a mumbly way. Able to eat mushy things (applesauce, yoghurt etc) from a spoon, and tea through a straw. Still on pain medication every 4 hours. And I could tell the instant it wore off. Another not fun day, although not as bad as the previous day. Mostly curled up on the couch, watching TV, or knitting.

Lip looked like this now. Impressive bruise, huh?

Bruise on inner lip


The Next Next Day

Able to talk a bit more, and able to eat a little more, although still sticking to soft mushy things and sounding a bit drunk. The bruise started to 'fall through' to the front of my face. Still needing regular Panadol.

Six Days After the Biopsy

Each day, naturally, things got a bit better. The bruise is a lot less now. I can talk normally, but wouldn't want to talk for too long. My lower lip still feels lumpy and aches constantly.  I'm not needing pain meds any more. Still using the antiseptic mouth wash.

If I tried to eat anything thick (like a bite from a hamburger), it would still hurt a fair bit. Still being careful about chewing. Can't rest my chin on a pillow, for instance, as that hurts  too much. I think the dissolving stitches might be starting to dissolve.

This is how things look now — inner bruise has mostly moved to being an external bruise below my lips :

Lip biopsy, inner lip after six days

Bruise below lips

Two Weeks Afterwards the Biopsy

It. Still. Hurts.


The wound is healing well, and the bruising is all gone. Stitches are starting to dissolve. But it still feels like there's something caught between my lip and gum (which, of course, there is). And it aches constantly. Eating still hurts a bit. And if I talk too much, it hurts more. I can't comfortably rest my chin on anything. And bumping my lip on anything hurts a lot. Getting there, but s l o w l y.

Three Weeks After

It still hurts around the biopsy site, and the surrounding lip area, but the more 'widespread' pain has eased off. Current theory is the surgeon damaged a nerve. They also took out a fair bit of muscle tissue, which makes recovery more painful. Even still, this level of pain post-op is unusual. My immunologist suggested Lignocaine Gel (available in pharmacies without a script) and it's pretty fabulous stuff. Why did no-one mention this stuff to me before??!

Biopsy was all clear, too, no sign of sarc. So we don't know what's causing the swelling, and it's likely it is still the sarc causing it (Melkersson-Rosenthal Syndrome), but they didn't manage to get the right area with granulomas in it ...  dammit. A null result doesn't rule out the MRS.

Four Weeks Later

Was still in pain, so I went back to see the oral surgeon. They removed the undissolved stitches (a horrifically painful procedure, despite local anaesthetic). The theory is that I was reacting badly to the suture material, or my immune system wasn't reacting properly to the suture material (I'm on immune suppressants), so it was just being constantly irritated by the sutures, but my body wasn't able to dissolve them. No sign of nerve damage, thankfully. 

Within a few hours of removal, the whole area started to feel better, and a day later there's almost no pain! Bliss! So this theory seems to be right. 

Moral of the whole sorry tale : if you're in bad, ongoing pain around the biopsy site, go back to the surgeon, much sooner than I did. 

I hope that this might help you, if you have to have one of these horrible things too. Pain meds and ice packs are your friends. Get Lignocaine Gel. Don't expect to do too much for a couple of days afterwards, apart from feeling sorry for yourself. Stock up on mushy foods, custard, jelly, applesauce, yoghurt, ice cream, soup, and so on. It is possible to get inflammation and reactions to the various suture materials. Hopefully you won't be anywhere near as badly affected as I was.

And if the hospital tells you there may be 'some discomfort', laugh in its face, bitterly.

07 April 2014

Another moving experience

Apologies for disappearing for quite some time ... we decided to start looking for a new place to rent in late February, and things moved unexpectedly quickly!


So — after several horrendous weeks of which we shall not speak — we are back in Weston Creek.  Very happy to be back in the area, and on a quiet suburban street. Ten years of living on main roads has been wearing. We're much closer to Mt Stromlo, and our other main destinations (largely doctors and the hospital).

Our new place has a downstairs area for the kids (one of our main reasons for moving, to find a place with a more separate living space for them, seeing as they're not able to afford to live independently yet). It comes complete with a full bar (including — bizarrely — cash drawer, sink, and three drinks fridges), wood-burning stove, small bathroom, and several rooms, and internal access to a big garage (glass workshop). 

Upstairs is for Hubby and me — four bedrooms (Hubby has his own study for the first time), kitchen with a gas stove and saucepan drawers (where have you been all my life?!), good sunny living areas, and two porchy / balcony thingies. With views!


The garden is leafy and lovely to be in (unlike our last place), and there is a paved area under cover for entertaining, too. The pups are adapting to the new surroundings, and we're all gradually settling in. The question of 'Where is ...' is less frequently answered with 'In a box somewhere!' so I guess that's progress!

We've not unpacked at least half of our boxes, and are loving the simpler minimalist feel of the upstairs section (kids' area is another matter!). So I still want to sort and declutter the rest of our stuff, and only store a bare minimum.

I calculated that this is the 27th home I've lived in. And the house in Gordon was the longest, at just over 6 years! No moss on this stone! But I am rather over the whole 'moving house' thing ... don't want to do this too many more times.

12 February 2014

Puppeh Casserole


A few months ago, the bods who make MyDog clearly changed their recipes, and both my pups suddenly decided to stop eating it. Unless they had a doggy conspiracy going. Yeah, it could have been that too ...

Anyway, we tried them on other tinned food, to no avail. They have Royal Canin dry food, so they weren't starving, but they weren't getting a good dinner.

So I started to cook Puppeh Casserole. (FOR puppehs, for them, goodness, what do you take me for?!)

And they love it! In fact, Petal loves it SO much that she's put on a bit too much weight. Chunky puppeh. Ooops. So we're giving her smaller meals now.

It's cheaper, and it's better for them. Even their vet was impressed — home-cooked food + the good quality dry food (for special nutrients that dogs need) is an excellent diet regime for pups. Having chihuahuas makes this very economical, too, as they only eat ¼ to ½ a cup each a day. One batch makes enough for roughly two weeks of meals for two chihuahuas.

(It also makes a rather good sandwich filling, especially the chicken one, once puréed!)

Puppeh Casserole

Two variations: Beef + Liver, and Chicken

Ingredients

This is a 'hand wavy' recipe:

Some meat:

~1–2 kg of meat  (a whole chook, chicken thighs, casserole beef, cheap mince, whatever — avoid meat with lots of tiny bones in it, though, like chicken necks)

Some diced liver, if you want to make beef + liver (but don't add too much, as heaps of liver is not good for dogs — 1 med small liver, chopped up, is plenty). I love my dogs so much that I will actually cook liver for them. This is saying a lot.

Some veggies:

Choose several / more than several of the following dog-safe veggies. You want roughly a quarter to a third of your casserole to be veg.
  • Peeled potatoes (the skins contain chemicals harmful to dogs)
  • Peeled pumpkin
  • Sweet potato
  • Peas
  • Green Beans
  • Carrots
  • Zucchini
  • Small quantities of broccoli / cauliflower, if they don't cause digestive upsets for your dog

Some other stuff:

A handful or two of brown rice or barley
A bit of water, around 1 cup
A few herbs (oregano, thyme etc) if you're feeling creative
Some ground pepper (my dogs like spicy food!)
A little garlic is okay

Please avoid : onions, mushrooms, tomatoes, nutmeg. (I use the cute app Om nom? to check for food safety for dogs.)

You may like to cook this on the stove top in a very large saucepan (which I usually do for the beef + liver one), or a slow cooker (which I usually use for the chicken one).

Method

Veggies ready to go
1. Roughly chop your veggies. I didn't peel the potatoes here, oops, but I usually do.

2. You may like to brown the meat slightly in the pan first, but it's not vital. Add the veggies, and other ingredients. When using a slow cooker, I put the veggies in first, and just sit the meat on top of them. If you're using liver, you might want to add it to the saucepan later on in the cooking process, as it goes a bit hard and rubbery if you overcook it.

Beef + Liver ready to go on the stove


3. Set it to cook for several hours, with a lid on. On the stove, you'll want to cook it on the lowest heat. I usually cook the chicken casserole for about 4 hours in the slow cooker, and the beef + liver one for about 2–3 hours on the stove.
Chicken Casserole in the slow cooker


4. Allow the casserole to cool a bit, so it's warm but not hot. Don't let it sit overnight in the fridge before deboning, everything solidifies and it makes bone removal very difficult. Ask me how I know  :p

5. If you've got bones in there, remove them. It works quite well doing this by hand, wearing rubber gloves (which protect you from the heat as well as the eeeeeeew liver). plus it makes you look like a surgeon. A very sick and amateur surgeon.

6. Use a stick blender or food processor to 'lightly' purée the casserole to the desired amount. I have to make sure the veggies are fairly well mashed otherwise one of my dogs (Petal), not naming any names (Petal) will flick every single one out with her delicate little tongue. But your dog may like it chunky. A potato masher works well for a 'rougher' texture.

Beef + Liver Casserole after cooking
Beef + Liver Casserole after puréeing
7. Now for portions. I use a silicone muffin tray to freeze the portions — it is brilliant, because I can just pop them out once they're frozen. It's that easy. I do half as smaller portions for little Miss Chunky, and larger portions for Griff (who is twice her size). I store them in ziplock bags and boxes in the freezer.


8. Each meal time, you just defrost a portion (1 or 2 minutes in the microwave, or you could defrost in the fridge overnight, or in a tiny saucepan), make sure it's warm for them (not too hot to burn their tongues), and then let the nomming begin!

Puppeh Casserole gets the lick of approval
Griff approves!


31 January 2014

Soboro Don

Last week I had the great pleasure of discovering the Just One Cookbook Japanese cooking blog. My goodness. I also bought Nami's ebook. If you're interested in trying Japanese cooking, head on over to her blog. Seriously. I'll still be here when you pull yourself out of Japanese Cooking World ... "Was I gone long? Where am I? Who are you? ... "

So on the weekend I made Tori Soboro Don. The online recipe has extensive step-by-step photos, and is very clear. It's a chicken donburi recipe — donburi means 'rice bowl dish', and refers to any Japanese meat /veg sort of stew, served over rice. Donburi is often shortened to 'don'.

This recipe is basically fried chicken mince, and scrambled eggs, with peas, over rice.

I couldn't get a hold of chicken mince, so used chicken breasts and diced them finely. Worked quite well, actually! The chicken is cooked with ginger, sake, sugar, mirin, and soy sauce. I actually cut back on the sugar a bit, and the result was still quite sweet. The whole mixture gets cooked down slowly until it's all gooey and delicious.


Then you beat together eggs with more sugar, and fry it, breaking it up with (ideally) a bunch of chopsticks. Having a severe chopstick shortage in the house at the time (now remedied, you'll be relieved to hear!), I used a mini whisk instead.

Wooo, action shot!


Yummo, who knew that sweet scrambled eggs could be so delicious! 

Lastly you defrost some frozen peas, and get creative in the bowl ... rice first, then the chicken and egg, and a sweet line of peas. I wasn't as tidy with my line of peas as Nami, but it still looks appealing. Top with pickled ginger.

Goddammit Blogger, why you no align things properly! Excuse the derpy layout ... what Blogger says is 'centered' clearly isn't what a human would think is centred.

Verdict? Huge hit with the whole family. The meat is sweet, caramelised, and salty, and the ginger gives the perfect contrast. The egg and peas are tasty too, with the chicken and rice. Very very nommy! And so pretty too! Despite the aforementioned lack of chopsticks. Now remedied.

Printfriendly